Sunday, July 24, 2016

Camping in Banff

Sleeping beside giants
The best way to gain experience in motocamping aside from buying your gear is to simply pack up your bike and head out to a campsite not too far from town. Ideally, just an hour's ride. So if things really don't go as planned you have a plan B to pack up and head home.

My first trip was out to Banff, along Tunnel Mountain Campgrounds in Early April. Camping in April on a motorcycle? In the Canadian Rockies? Gotta be pretty crazy, eh? I didn't realize how crazy I was until the evening arrived.

Saddled up with an Icon Primer Tankbag, a backpack, and a Kappa (givi) 46 case which held all my camping gear. After this trip, I would vow to change my packing solution due to handling issues with weight so far back.

Initially I was supposed to head out to Bow Valley Parkway to camp at Johnston Canyon. Live and learn, call before hand. Nothing like driving out to 'CAMPSITE CLOSED' signs. Turned back to Banff town center to learn that all of the front country campsites with the exception of Tunnel Mountain was open.

The lady at the ranger station kindly placed me on lot D14. With a pretty prestine view, and while not too far from the Ranger Station was very quiet with the RVs and powered lots a ways away. There's 2 routes up, one through the town center, which I highly reccomend doing to see the village of Banff. The other is Tunnel Mountain Road which is tight, winding and fun. You could hear motorcycles taking the road well into the night, and it put a grin on my face to hear them having fun.


Forecasted highs of 19, low of 4 (66F to 40F). The weather was clear and little to no wind during the day. A few spirited jaunts out to the Lake Minnewanka region across Highway 1, scant and tight, and I was happily sated.


Setting up the tent was a relatively simple process. I had practiced in my backyard, save the embarrasment to yourself rather than around others. I picked out an MSR Elixer 2 tent from MEC (Mountain Equipment Co-Op). It packs down small, and is rather spacious and comes with a rain fly and ground sheet for a pretty reasonable price. It's 18.5 inches (46.5cm) with the poles and rounds out to about 6 inches when stuffed down into a spot (15cm). Setting up is easy, with color coordinated poles, and fixtures. Not the fastest to set up, or the lightest, but it is compact and reasonably priced - it even came with a ground tarp made for it. Some tents don't come with that.

Bedding wise, my pad is a Klymit Static V. It's a inflatable sleeping bag that packs right down into a bag that's about 2 of my fists in size end over end. It saves a lot of space by having channels and valleys to make effecient use of space. The Channels are angled in such a way to provide support along the neck and spine, while the valleys allow room for your sleeping bag to loft under you to provide warmth. Or, allow air to pass through to cool during the summer. Pretty neat. It comes with a replacement valve, and a patch kit to repair ruptures or rips. So far, the material has been robust enough to avoid that.

Sleeping bag came in the from of the Teton Trailhead 20F Sleeping bag in orange and grey. I've tried a few other sleeping bags, and let me tell you, whatever Teton uses as a liner is amazing. It's not sticky or plastic, it's some microfibre, very pleasant like you're wrapped in a blanket rather than a plastic tube. The anti-snag zippers do alright for the most part and it's a little more spacious then a mummy bag. The size of trailhead however had me a little dubious about it's temperature rating, which that first night proved all too well.

It hit 0 degrees, or 32F for you Imperalist. Even with a microfibre liner, 2 layers of thermals, a sweater, and thick cotton jammies. Despite that, I spent most of the night shivering and wishing the day would come.

Post trip, the first thing I did was to start a return with Amazon on the sleeping bag in exchange for Teton's LEEF 20F bag. The LEEF bag has a double zipper baffle, and a thicker more robust shell to disallow drafts from entering the bag. Having slept out in similar conditions to the Trailhead, the LEEF is a TRUE 20f bag. While the Trailhead is more likely a 40F bag (with a survival rating of 20F)


Friday, July 24, 2015

Chain Maintenance

Chain Maintenance, Why?


There are 3 ways to transfer energy from the engine to the rear wheel on a motorcycle. There are chains, belts and shaft drives.

Chains are the most common on motorcycles. Dirt bikes, Dual sports, Sport bikes, Race bikes, Touring bikes, some cruisers.

Most bikes with a chain drive - wallpapers4me
Chains tend to stretch as forces are applied to them. They are also prone to kinking, jamming and wear the fastest of the 3 drives. They are also the easiest to maintain, the cheapest, and can last a long time if taken care of properly. Expect 20,000km (or close to 14,000 miles) from a well taken care of, quality chain+sprocket)

You can also move up in chain lengths and sprocket sizes to chain to change the gearing ratios.


BMW F800GT Belt Drive - topspeed.com
Belt Drives are the next most common. Almost on all cruisers, some touring/Sport-touring bikes.

Of all the drives, they are the most fragile, but middle of the road for longevity and price for replacement. These last an average of 40,000-50,000km (28,000-33,000miles) between replacements.

They can fail, just like chains, but unlike chains, it will -NOT- end in catastrophic failure.
They are also whisper quiet, and don't have drivetrain lash like chains do. (making for a very smooth ride)

Shaft Drive - motorcycle-usa


Lastly, shaft drives. They are the least common on bikes. They have a shaft drive, similar to a car. They are the heaviest of the drives, but last the longest.

Expect nearly 100,000km between replacements, although the fluid and grease inside the shaft must be serviced once or twice within that span.

They are the most quiet of the 3 drives, but requires careful clutch control.

So again, why chain maintenance?

The chain on your motorcycle is what transfers energy from your engine to your rear wheel. Maintenance must be done to ensure that the chain lasts as long as it should, and that catastrophic failure does not occur.

What can happen? The chain can slip off the sprocket if it stretches too much, locking the rear wheel.

It can also snap, cracking your crankcase open, damaging your swingarm, or even taking a chunk out of your left (or right if you've got a right sided chain) leg that's resting oh so close to it.

The chain is designed to be the component that fails first within the drivetrain and engine of your motorcycle. Because it is the easiest to perform maintenance on and replace.

How do you take care of a chain?

Chain maintenance should be done every 500 (350miles). Don't panic! This doesn't mean you have to go about going crazy on the chain every 500km. 

Every 500km, the chain needs to be lubed. Just grab your can of chain lube and give the chain a good spray. I recommend spraying it from behind the sprocket or at the bottom of the sprocket where the chain meets it. You can spray the midlength (where the picture indicates with that tool) if you prop a piece of cardboard between the chain the wheel. You DO NOT want lube on your tire. That's a pretty fast way to have a bad day.


Next, every 1,000km, or if you ride excessively in rain, (or 1,500 depending on how dirty it is) the chain should be cleaned, wiped and relubed. You can start by spraying WD-40 or simple green works too, and then with an old tooth brush - wipe that chain. All 4 sides of it, cleaning the brush every so often with clean water.
One of these small brushes can help save you from a lot of elbow grease. Once the chain has been brushed with a degreasing agent, grab a clean cloth and wipe the chain. You should keep wiping the chain until no black stuff appears anymore.

This can take a while, have a few clothes nearby. Once that is done, clean your sprocket teeth and face too, and repeat with the wiping.

After that, feel free to spray on some new lube, and you're good to go.

Clean chain and sprocket, is a happy chain and sprocket


Having a clean chain also reduces the amount of times you need to adjust the chain to account for the stretching that happens over time to it. Adjusting for stretch is a painful procedure that I'll mention in the future.

Thursday, April 9, 2015

The Little Tankbag That Could

A short story of a tankbag that decided to have an adventure

What is a tank bag? A tankbag is a bag that afixes to the gas tank of your motorcycle. It can be secured by magnets, straps or a hardware mount. They are all different characteristics depending on the type or combination of mounting system.

Magnets are easy and quick. They can fall off the bike or scratch the paint.

Straps are slow and tedious, but they are reliable. Can still scratch the paint

Hardware options make sure the bag doesn't make contact at all with the gastank, to avoid chipping paint, and it very quick and easy - as well as adding more security. Expensive though.

My bag is 3 liters in capacity 
So, I went off to Canmore on my motorcycle. Windy day, 30kmph winds, 40kmph winds (20-25mph wind gusts).

Placed my magnetic tankbag on my gastank to secure it so it'll stay put.

 In the midst of tucking behind my small sport bike windscreen and leaning off the bike, not to mention getting blown around, I made it to Canmore! Only to place my gloves on my gastank. Wait, what? I shouldn't be able to do that, because I HAVE HAD A TANK BAG

So I headed back home to go find it. Scoured up and down the highway for it. No suck luck

I felt pitted. Like jeez, I lost my tank bag. It just so happened I was using my Ram Mount as a place to secure my Sony Action Camera for filming. So my tankbag was holding my GPS mount/GPS/Cell phone tripod+mount. So yea, I felt pretty down and not very happy with myself. 

But, all was not lost! A good Samaritan headed to my home and returned my bag. They found it by the highway, scratched off and such. They figured it came from a motorcycle since it was a magnetic tank bag. Good thing I had my GPS inside, they hit 'go home' and were able to return it.
Damage to the tankbag, the two pins on the strap. There's scratches on the paw, and a light scratch along the emblem
 Scratching again. 
 So for future use, I made a tether that will attach to my RAM mount, a insurance policy of sorts to make sure I don't lose it again. I'm thankful I got it back, and man - What a journey my tankbag had

Wednesday, March 25, 2015

Installing R&G Radiator guard

R&G Radiator Guard


I received this a couple of days ago. I wasn't sure what it looked like from the photos, I wasn't even sure how it was going to mount onto the radiator. 

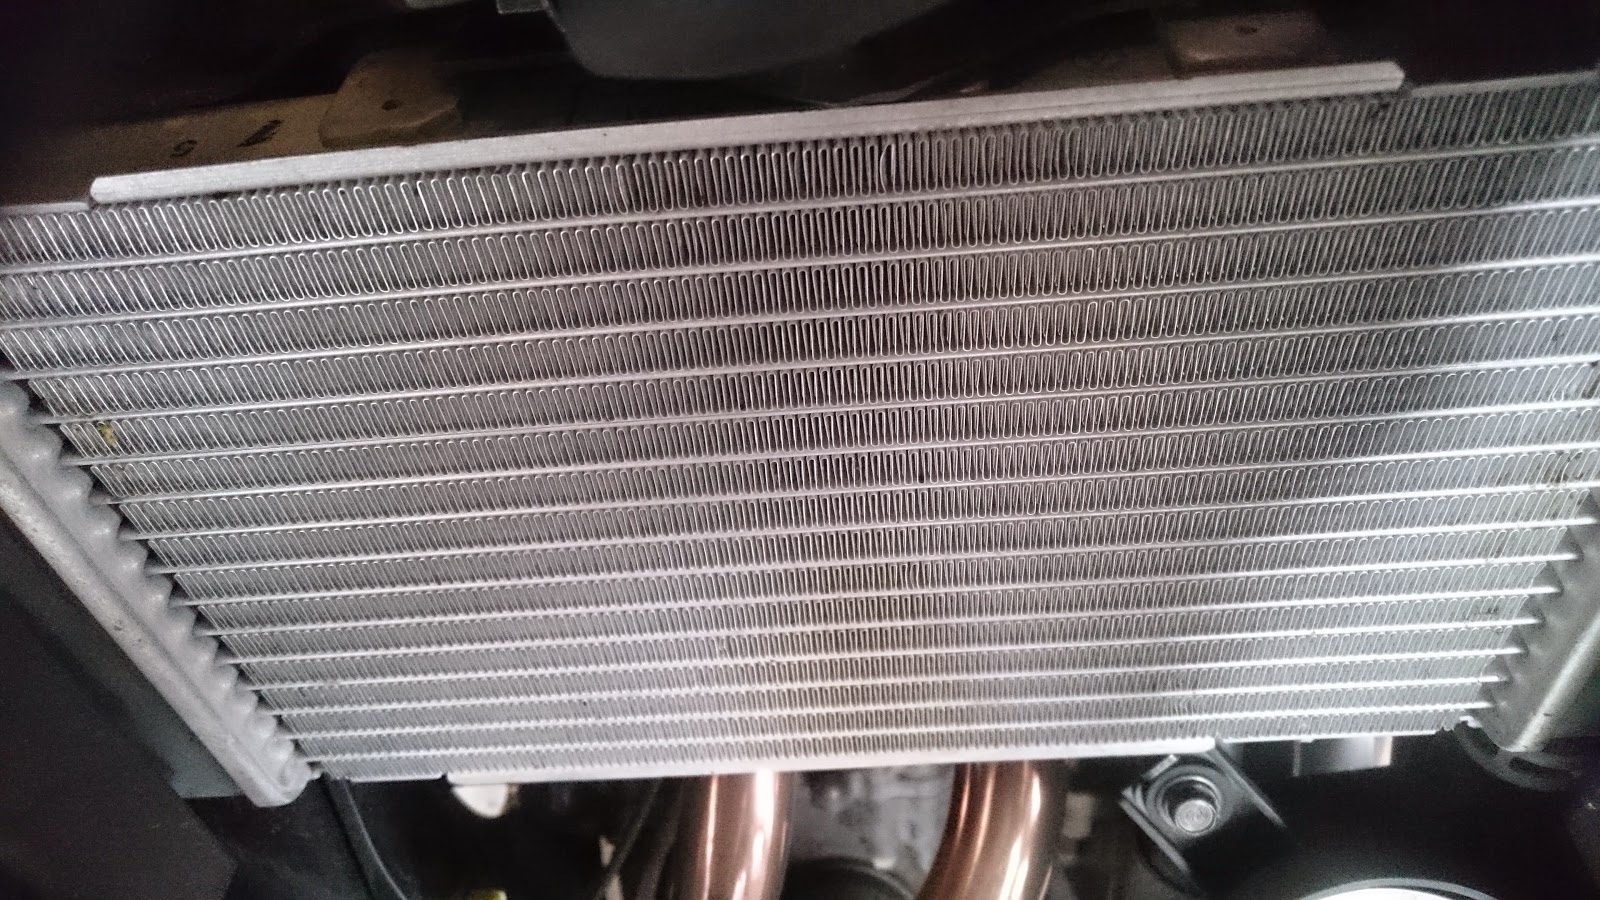
I was even shocked to hear that it weighed less than a lb. At least, until I saw what it looked like. It fits onto the radiator mount with the single top bracket, and 2 brackets on the bottom. The two bottom were empty, the radiator uses them, not sure how though.

 These are heat resistant pads to separate the radiator from the guard and provide some kind of support from being pressed in. Even if slight.
This is the current radiator before the guard is put on. There's little to no damage on it, but, let's compare that to the CBR250r
 Yea, it's not as scar free as the CBR500r. The CBR250r currently sitting over 5,000km. There's a singe mark from where a cicada got stuck in the guard and burned a little spot in the center bottom. There's rocks that have dinged and bent numerous fins. 
The new guard should protect it from large bugs and rocks from damaging my radiator. If the 4,000 so kilometers I added to my CBR250r was any indication, damage will happen. Little or not, hopefully it'll protect the guard in the long run.


Thursday, March 19, 2015

Cold Riding Days

Wind and Gusts

Cows and Big Horn Rams

I really did try to take a picture. The Big Horn Rams were not pleased and tried to charge. The cows kept trying to get near my motorcycle.


I had to make a stop in Canmore. I had left Calgary with 2 (it showed as 3 when I left and instantly dropped to 2) bars of fuel (out of 6). In the mountains I got a  bit worried as I dropped down to 1 bar. And whilst pulling up to the pump I was on my reserve for about 20km. Supposedly I can go about 70km on my reserve, but...I didn't have a auxillary fuel container to test that out.

Leaving Calgary, it was reported to be 11*C (50*F) and 7*C (45*F) in Canmore. I was also wondering if I could make it out to Banff but some snow clouds in Canmore convinced me to turn back before the storm caught me. There's a storm hitting Calgary tomorrow, those very clouds over Banff/Canmore will be over Calgary in about 12 hours.

On the way back to Calgary, I was able to stop by Gap Lake again to test out some new Cellphone Camera Gear. 


Wednesday, March 18, 2015

More Spring Rides into Canmore

More Riding

Shame to be wasting good riding time otherwise. The suns out, ice gone and gravel non existent. Lots of wind though.

  Despite the harsh winds, there were still quite a few other motorcycles out there. Lots of East wind, so getting to Canmore is a big struggle. Coming back home is a joy though, no wind at all, though you're pretty much battered and tired at that point.


Need to bring earplugs the next time I ride, the wind noise is deafening. Can't even hear the exhaust or the motorcycle or other vehicles because of the wind.

Not a problem when there's no wind, the Shoei RF 1100 is pretty good with blocking out wind noise. But not when you're riding into 30-35km winds whilst going at 100km 

Friday, March 13, 2015

First proper ride of 2015

It's Spring!


Hopefully it stays spring

Click for full resolution
Gap Lake, picnic side. Click for full resolution

Got to take out the bike for a proper ride through Highway 1A, a smaller highway that runs parallel to the Trans Canada Highway (Highway 1), and although I took it slow to Canmore, I had a blast coming back.

Why take it slow? I havn't been on this stretch of road since early November of last year (Yay for short Winter), so not only am I not wholly accustomed to
the twists and turns as I once was, I have no idea about the road conditions. 

Salt eats away at the metal and other finishing of the motorcycle (plastic), and especially engine parts since they are exposed to the tire splash.
 
Gravel can cause an accident as the front wheel or rear wheel suddenly loses traction while midturn or lean. It's sudden and violent. The best way to avoid it is to know where there is gravel and to slow down.
But how was my ride on the way back? Amazing. 

I am very glad I decided to head out early in the season while the Casual Harley/Cruiser (There are hard core cruiser riders), and weekend sport bike riders (There are hard core sport bike riders), are waiting for the streets to be officially cleaned of gravel. While they wait, I'm out there enjoying some pristine roads, little to no gravel, pot holes on the far right side of the road, 

(There are no dual sports/Super motos on the list of lazy riders, because they are always hard core riders)

The CBR500r feels like a proper big bike. Bigger overall dimensions, more weight and wider tires - all make the motorcycle feel ... more. More power than then CBR250r but not crazy amounts.


Overall, a fun day out.